Check out The Pottery Shed in Sydney’s Surry Hills. The perfect place to meet new friends, try your hand at pottery and explore the city.
When I tell my friends I want to try pottery, their reply is always: “oh, so you can do that scene from Ghost, right?”. I nod and say yes because somehow that answer is less embarrassing and probably more age-appropriate than the truth.
The truth is while we were in lockdown, I spent way too much time scrolling TiKTok and found myself in the weird and wonderful world of #CeramicTok. These are modern-day, twenty-something Swayzes, casually blending skill and shirtless-ness to make the whole thing look effortlessly sexy. Shoutout to @satisfyingceramics, @pappapots and @lowham_ceramics, just to name a few.
After all, how hard can it really be? Humans – more accurately, us Chinese – have been doing it for over 20,000 years.
I decided to find out.
The Pottery Shed
Having been inspired by the incredible creations of Clay by Tina, I decided to attend classes at The Pottery Shed in Surry Hills. It was started by LA potter Joe Darling on the philosophy of taking people right off the street and onto the wheel to experience the magic of pottery. The classes are taught in small groups and designed to be taken over 3, two-hour sessions that guide you through the basics of wheel-throwing, trimming and glazing. At the end of the final class, you’ll have your first finished piece.
The classes run Monday to Sunday. So it’s easy to find time that works around your university and part-time work schedule. You’ll get an email reminder closer to your session and a chance to re-book at no extra charge up to 2 hours before the start of the lesson. It’s all very zen and flexible. A sign of things to come.
Classes are around $60 per person, and once you’ve completed the series, you can return for $40 per session. Think of it like a casual gym class that you can drop in and practice anytime you want.
Pottery Class One: Wheel Throwing
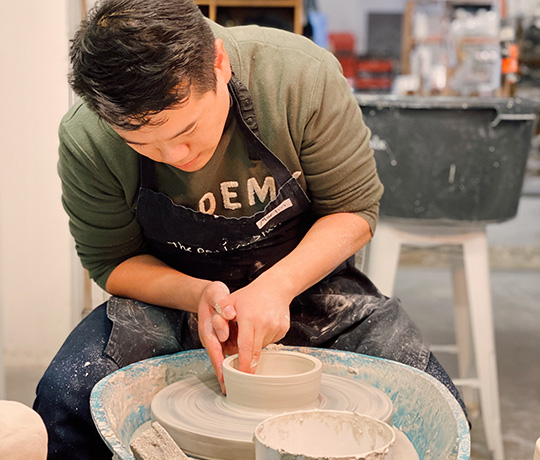
The first time you arrive in the studio, it’s easy to be a bit intimidated. Wheels organised in a circle, amazing creations all around you. When we walked in, there were a couple of hipster-types with headphones on, sculpting these incredible, swirly mugs that defy gravity. Clearly looking like a fish out of water, one of these bearded ceramic geniuses stood up from the wheel and introduced himself to us as our instructor for the night. Ryan. His easy manner and relaxed vibe immediately put us at ease and after we exchanged a few jokes, we knew there was nothing to stress about here.
Once the rest of the class arrived, we were ready to kick off. Ryan gave us a quick introduction of the space and an overview of the three classes. Then – as advertised – we were ready to get on the wheel.
Wheel-throwing, as it turns out, is a lot like yoga. And that’s not just because of the stick of incense that was burning in the warmly-lit studio. As Ryan explained, shaping the clay isn’t about pushing and pulling the clay into submission. Rather, it’s about making the right hand gestures – known as asanas – to allow the clay to flow into the shapes you (and sometimes, the clay itself) wants to be.
I love that analogy and it was very helpful to have that image in the back of your mind when you’re going through the steps of wheel throwing.
We first learned how to centre the clay so that the clay itself is mixed consistently. This way, it stays on the wheel while you shape. As well as making sure it won’t crack or break in the firing process. This is the bit you saw in Ghost, but in real life, you have to do it multiple times to make sure it’s properly mixed. It should look like a solid, condensed bit of baked cheesecake when you’re finished.
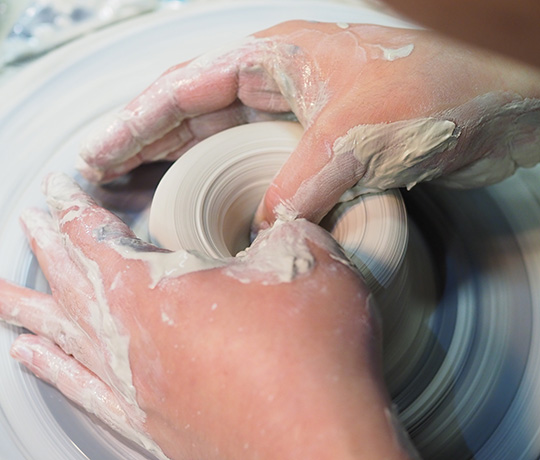
Then, you start to open up the clay with your hands in an “A” position . Using your thumbs (and A LOT of water) dig into the centre of the clay to create a v-shaped hole. Once this opens out, rest your left hand on our right wrist – called the “X” position – and use two fingers to widen and deepen the hole you’ve created.
While your fingers are here in the centre of the clay, drag it out towards the outside of the wheel in a firm hook shape to widen the base to the size you want. Make sure the floor of the clay is flat and even. Mine turned out WAY too thick!
Then, it’s time to do the T-Rex. Hook your thumbs together, tuck your ring finger and pinky in and you’ll have a claw. Pivot from your waist down to the clay and you’ll be able to have two fingers on either side of the wall. Gently squeeze your fingers together and draw them upwards towards your face to pull up the sides of the walls. Aim for an even wall and don’t over-squeeze! My tip is to use plenty of water here.
My pants were definitely flicked with lots of wet clay, but it makes the process a lot easier and might actually go some way to explain why people are always shirtless when they’re doing this at home. To my knowledge, nudity – albeit partial – is not encouraged in The Pottery Shed.
Within the two hours of the first class, there’s plenty of time to learn to do two lots of pots, and each session you’re allowed to make two boards’ worth of whatever you like. That means you can create two giant vases, or a series of ceramic coasters and coaster holder (which were super cute). Just as long as it fits onto the provided board. I’m definitely coming back to do a few more practices of the wheel-throwing, but by the end of the two hours, we felt like we had a pretty good grasp of the basics. Thanks, Ryan!
Class Two: Trimming
When I arrived for our second class, we were greeted like old friends, which was a pretty nice feeling. I found our little creations from the first lesson and got down to the business of turning what turned like two dog bowls into something a little more refined.
To start off, we had to remove some of the moisture from the clay so that the pot had a bit more structure to it. To do this, we were given these heat guns that could go up to 600 degrees. The trick is to hover over our pots with these and slowly dry it a little section at a time until it was dry on the surface, but still retain enough moisture to be soft.
Once this was done – and it took a good 15 minutes for me each – we did a bunch of measurements to determine where the pot should curve to and marked where the base of the clay was so that later you wouldn’t trim it too far when creating the foot of the pot.
To be honest, I followed all of Ash’s instructions to measure it out, but by the end, completely ignored my own markings and didn’t even really know what to avoid. If you guys go and remember that part of the lesson, please tell me what it was for! Whoops!

Next up was the really tricky part. In order to successfully trim the pot, it has to be anchored back onto the wheel – dead centre. To do this required a lot of subtle tapping and nudging of the pot in small increments while spinning the wheel at a low speed. Probably the majority of the class was spent perfecting this.
Once you’ve done that, the rest was quite satisfying actually. Using the wooden tools, we follow the shape of the pot and gently shave down to create a bowl shape. It was so satisfying. And frankly I might be able to make a few ASMR videos just from filming that part of class!
This is probably the biggest tip that they should have shared; at the end of the first class, you will end up with two clay pots that book like cylinders. Don’t stress! The second trimming class will take this dull-looking clay cylinder and turn it into something much more beautiful.
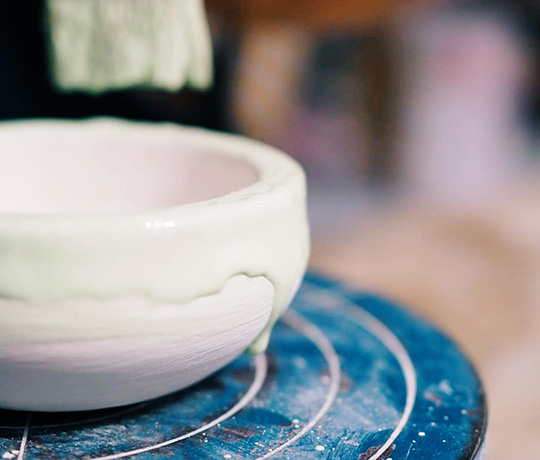
Class Three: Glazing
This was technically the easiest of the three classes, but ultimately the one I found most difficult. That’s because at the pottery shed, there are hundreds of glazes and underglazes to choose from. The combination of these glazes result in literally thousands of combinations.
Before I took this class, I spent some time walking around the studio and looked at the other student works that were fired and ready to be picked up to gather some inspiration. There are beautifully simple, rustic glazes, all the way through to hand-painted murals that were displayed on giant ceramic pots. It’s easy to get lost and overwhelmed by all the wonderful creations in the room!
But thankfully, we had the very patient and experienced Ash leading our class. Ash took the time to explain the interplay between different layers and the different results you could get. Some students had taken the time to dive into Pinterest beforehand for inspiration.
I felt like a kid in a candy store. The Pottery Shed had a few ready-made suggestions as little tiles to help first timers like me to get a good solid outcome. I (of course) followed none of these and decided to create a simple oatmeal interior and exterior coat with a bright, single-colour runny glaze on the top of each of my bowls to create a dipped effect.
That only took about an hour’s worth of deliberating and choosing between the colour options! Next time, I’d definitely recommend to have done a little homework beforehand to narrow down the choices.
Meeting my final creations
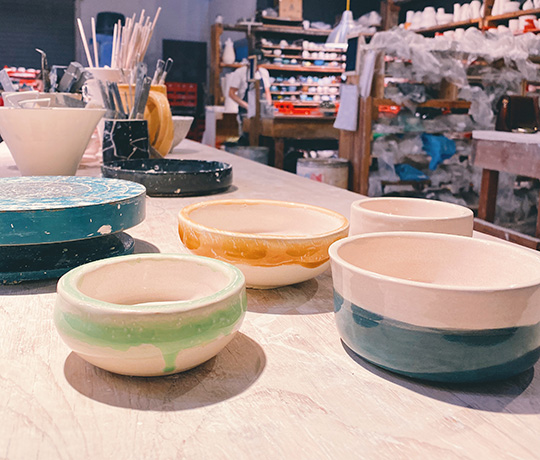
A couple of weeks after the final class, I received an email saying that my creations were ready to be picked up. I felt like a new parent and couldn’t wait to go see if my vision has come to life the way I expected. Here goes…
See, that’s the thing about glazing – the colour you see at the time of painting is almost never like the final product. The silica melts and mixes with the pot to create the beautiful shine and colour effect that can only be seen after it’s been fired. Also, the interplay between the under glaze and the colour glaze you picked is not immediately obvious and often shows up differently after you’ve fired it. So there’s no way to 100% know what it will look like when you’re painting.
When I arrived at the shelf, I immediately saw my babies. And they were GORGEOUS! OK, so they’re not perfect and not quite how I imagined. But seeing my weeks worth of effort and waiting come to life in these two hyper-coloured little bowls, I was so happy! It was also immediately clear that I needed a lot more practice. But for my first creation, I was pretty chuffed.
Will I make pottery an ongoing hobby?
All in all, I’m so pleased to have done the course and tried this new hobby. I’ve already bought my drop-in pass so I’ll be back.
Most of all, I gained a lot more respect and appreciation of the art and experimentation behind pottery and the effort it takes from these small businesses. I now pick pottery up, and look to admire the thinness of the walls that are pulled, or the way the glaze has run together to create a beautiful, subtle marble and see it as something a lot more special and unique than I’ve ever noticed.
I also now appreciate paying a little more for a handmade piece than a mass-reproduced item. Much like watching a live performance, I’ve learnt that what you’re paying for is not just the item you’re holding in your hands. It’s the years and countless failed throwing or trimming or glazing combinations that the maker had to have gone through to result in this one piece.
It’s clear I have a long way to go yet before I can quit my day job and become a potter. But I’m definitely going to be giving it a few more practices. So sorry in advance to my friends and family, because you’re going to be getting a lot of imperfect clay items for a few birthdays and Christmases to come!
If you’re interested in signing yourself up for a class or three, click here!